
Homemade strawberry rhubarb pie has been a tradition in my family from as far back as I can remember. Our bushy, large-leafed rhubarb plant grew right along side of my parent's home, and I remember as a child my mother and father telling me how the plant came from my father's childhood home, transplanted to my parent's home when they built it in the early 1960's.
On pie-making day, mom would send me outside to pull out the long, colorful stalks of rhubarb, instructing me to just "pull the stalks straight out from the plant" where they would make a snapping sound when pulled, and then cut off the giant green leaves with a paring knife. She would wash the stalks and then cut them into one or two inch pieces, and then mix them in a bowl with fresh strawberries, dust them with a concoction of powdered ingredients, and then finally, when the filling was put into the bottom pie shell, she would work on crafting the intricately woven lattice top crust.
My entire family loved the tart rhubarb and sweet strawberry blend, and mom would sometimes alter the quantity of sugar depending on the sweetness or amount of strawberries and rhubarb used, a skill perfected by her years of baking.
Mom is now 84 and still in her home though my dad passed on about 17 years ago. It's sometimes hard to believe it's been that long. The years just fly by, don't they? But each spring and summer my own daughters and I look forward to visiting mom and pulling some rhubarb to carry on the family pie-making tradition. We were just there the other day, and I thought to snap some photos while I replicated mom's old recipe.

I showed my daughter Erica how to pull the rhubarb, and off we went to make our own pies. Though my mom always made a homemade pie crust, to save time I used a refrigerated crust this time around, since well, sometimes I just can't do it all! Whichever route you choose to take, you will need two crusts, one for the bottom and one for the top. I like the premade ones that you just take out of the package, bring to room temperature, and unroll.
I like to get out my rolling pin, sprinkle my tabletop with just a tiny bit of flour so the crust does not stick to the table, and then give the crust another one or two quick rolls with the rolling pin to smooth it out and to make sure its the same thickness throughout. Okay, time to make pie!

You will need:
2 pie crusts, homemade or premade refrigerated type
Fresh rhubarb, about 2 cups
Fresh strawberries, about 2 cups
Cornstarch, 1 & 1/2 Tablespoons
Flour, 6 Tablespoons
Sugar, 1 & 1/4 cups
Butter, about 1 & 1/2 Tablespoons cut into 6-8 small pieces
Waxed paper

Wash your rhubarb and strawberries and assemble your work space. Make your pie crusts and then line a pie plate with one pie crust and set aside. In a separate bowl mix the dry ingredients: flour, sugar, cornstarch. Set aside.

Chop rhubarb into bite-sized pieces, about 1" to 1 & 1/4" in size. Hull the strawberries and chop in half. I keep the small ones whole, and I quarter or third any super-gigantic ones. Place the chopped rhubarb and strawberry into a large bowl.

Pour half of the dry mixture onto the rhubarb and strawberries and toss to completely coat.

It should look something like this.

Pour the coated strawberry-rhubarb into the pie crust-lined pie plate.

Now sprinkle the remaining half of the dry ingredients evenly on top of the strawberries and rhubarb. Cut the butter into about 6 to 8 small pieces and dot the top of the pie with butter. Set pie aside and preheat oven to 425 degrees Fahrenheit.

Now it's time to make the lattice top crust. It's easier than it looks! Roll out the second pie crust - I like to make sure its on the thin side, but not too thin that it tears when you lift a strip off of the table. Use a pastry wheel, knife or pizza slicer to cut the crust into long strips.

Try to make each strip about 3/8" to 1/2" wide.
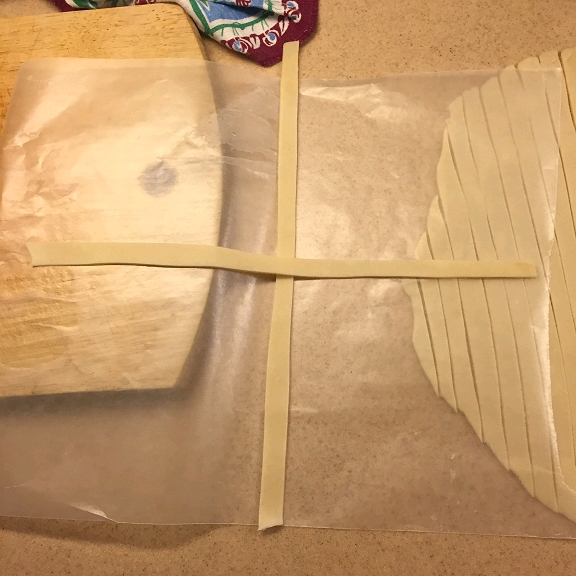
Tear off a sheet of waxed paper a little bit larger than your pie crust. Starting with the longest strips of crust, create a cross on the waxed paper by first laying one strip vertically. Then lay the second strip horizontally so that it overlaps the first vertical strip.

Now add a third strip as shown in the photo, placing it vertically over that second horizontal strip that you just put down.


You are creating a woven pattern of over and under. Each time you lay down a strip you have to lift every second strip so that the strip you are laying down goes under and then over, and then under, and then over.

Keep repeating this pattern as shown above. If your strips get too short you can re-roll them or just stick two short ones together to make a long strip. It doesn't have to be perfect!


Keeping the lattice crust on the wax paper, very carefully put your dominant hand beneath the wax paper and lift the lattice up and off the counter. I am right-handed so I use my right hand beneath the lattice. (You will use your opposite hand to help guide the lattice onto the pie.)

Hold the lattice on the waxed paper right next to the pie and very carefully and slowly turn the crust over onto the top of the pie - try to get it as centered as you can because you will not be able to move the lattice once it is on the pie. Do not flop it on quickly. Take your time and go slowly.

Once you have the lattice on the pie, very carefully remove the waxed paper, watching that it doesn't stick to the lattice.
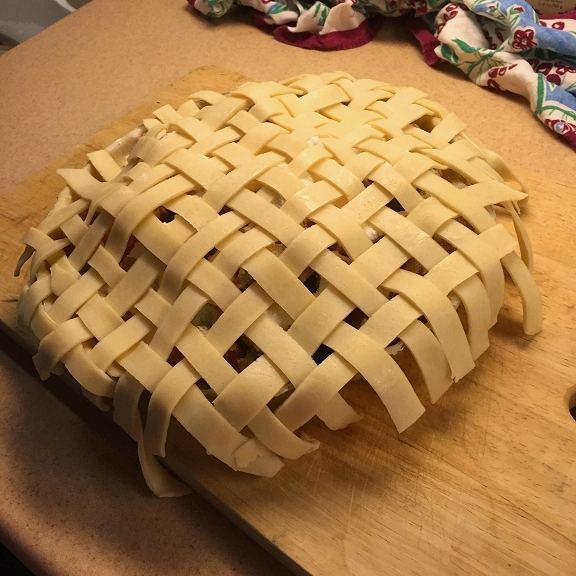
Whew! Now to get rid of those scraggly ends...

Fold any scraggly ends neatly into the crust, creating a nice edge. If you prefer, or if you have too much extra lattice hanging over the edge of the pie plate, you can carefully cut it off and discard it. Once you are finished, you can sprinkle a little bit of sugar on the crust if you like.

Cut a few strips of aluminum foil and form a cover for the crust so that it does not burn while baking. You will remove this foil for the last 15 or so minutes of baking.
Bake at 425 degrees Farenheit for 40-45 minutes. Remember to remove foil from edges for the last 15 minutes of baking.
If the pie becomes very bubbly while in the oven and starts to drip over a bit too much, you can put a piece of aluminum foil on a rack below the pie so that the drippings don't dirty up your oven.

Allow to cool completely before slicing.
Best served at room temperature.
Serve with a scoop of vanilla ice cream if desired. Refrigerate any leftovers. Enjoy!
Best served at room temperature.
Serve with a scoop of vanilla ice cream if desired. Refrigerate any leftovers. Enjoy!

Are you a fan of strawberry rhubarb pie?
Please leave a comment below!
Pin this post!

Have a great week!
Laura

My broken china jewelry is always available for purchase at https://www.etsy.com/shop/dishfunctionldesigns
Article & images copyright ©Laura Beth Love for Dishfunctional Designs™ 2018
all rights reserved


