Showing posts with label food. Show all posts

Friday, July 6, 2018

Old Fashioned Homemade Strawberry Rhubarb Pie Recipe


Homemade strawberry rhubarb pie has been a tradition in my family from as far back as I can remember. Our bushy, large-leafed rhubarb plant grew right along side of my parent's home, and I remember as a child my mother and father telling me how the plant came from my father's childhood home, transplanted to my parent's home when they built it in the early 1960's. 

On pie-making day, mom would send me outside to pull out the long, colorful stalks of rhubarb, instructing me to just "pull the stalks straight out from the plant" where they would make a snapping sound when pulled, and then cut off the giant green leaves with a paring knife. She would wash the stalks and then cut them into one or two inch pieces, and then mix them in a bowl with fresh strawberries, dust them with a concoction of powdered ingredients, and then finally, when the filling was put into the bottom pie shell, she would work on crafting the intricately woven lattice top crust. 

My entire family loved the tart rhubarb and sweet strawberry blend, and mom would sometimes alter the quantity of sugar depending on the sweetness or amount of strawberries and rhubarb used, a skill perfected by her years of baking.

Mom is now 84 and still in her home though my dad passed on about 17 years ago. It's sometimes hard to believe it's been that long. The years just fly by, don't they? But each spring and summer my own daughters and I look forward to visiting mom and pulling some rhubarb to carry on the family pie-making tradition. We were just there the other day, and I thought to snap some photos while I replicated mom's old recipe. 

 My daughter Erica with rhubarb from mom's yard - that's enough for two pies!

I showed my daughter Erica how to pull the rhubarb, and off we went to make our own pies. Though my mom always made a homemade pie crust, to save time I used a refrigerated crust this time around, since well, sometimes I just can't do it all! Whichever route you choose to take, you will need two crusts, one for the bottom and one for the top. I like the premade ones that you just take out of the package, bring to room temperature, and unroll. 

I like to get out my rolling pin, sprinkle my tabletop with just a tiny bit of flour so the crust does not stick to the table, and then give the crust another one or two quick rolls with the rolling pin to smooth it out and to make sure its the same thickness throughout. Okay, time to make pie! 


You will need:
2 pie crusts, homemade or premade refrigerated type
Fresh rhubarb, about 2 cups
Fresh strawberries, about 2 cups 
Cornstarch, 1 & 1/2 Tablespoons
Flour, 6 Tablespoons 
Sugar, 1 & 1/4 cups 
Butter, about 1 & 1/2 Tablespoons cut into  6-8 small pieces
Waxed paper


Wash your rhubarb and strawberries and assemble your work space. Make your pie crusts and then line a pie plate with one pie crust and set aside. In a separate bowl mix the dry ingredients: flour, sugar, cornstarch. Set aside.


Chop rhubarb into bite-sized pieces, about 1" to 1 & 1/4" in size. Hull the strawberries and chop in half. I keep the small ones whole, and I quarter or third any super-gigantic ones. Place the chopped rhubarb and strawberry into a large bowl.


Pour half of the dry mixture onto the rhubarb and strawberries and toss to completely coat.


It should look something like this.


Pour the coated strawberry-rhubarb into the pie crust-lined pie plate.


Now sprinkle the remaining half of the dry ingredients evenly on top of the strawberries and rhubarb. Cut the butter into about 6 to 8 small pieces and dot the top of the pie with butter. Set pie aside and preheat oven to 425 degrees Fahrenheit.


Now it's time to make the lattice top crust. It's easier than it looks! Roll out the second pie crust - I like to make sure its on the thin side, but not too thin that it tears when you lift a strip off of the table. Use a pastry wheel, knife or pizza slicer to cut the crust into long strips. 


Try to make each strip about 3/8" to 1/2" wide.
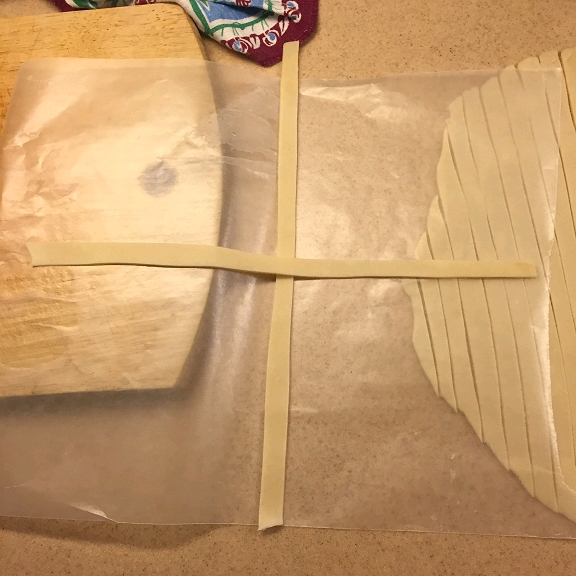

Tear off a sheet of waxed paper a little bit larger than your pie crust. Starting with the longest strips of crust, create a cross on the waxed paper by first laying one strip vertically. Then lay the second strip horizontally so that it overlaps the first vertical strip.


Now add a third strip as shown in the photo, placing it vertically over that second horizontal strip that you just put down.


Add the fourth strip of crust horizontally (see photos above and below) and lift the vertical strip up to weave that fourth strip so that the strips go over and then under. 


You are creating a woven pattern of over and under. Each time you lay down a strip you have to lift every second strip so that the strip you are laying down goes under and then over, and then under, and then over. 


Keep repeating this pattern as shown above. If your strips get too short you can re-roll them or just stick two short ones together to make a long strip. It doesn't have to be perfect! 


Once you have finished weaving and used up all of your strips it is now time to place the crust on top of the pie! 


Keeping the lattice crust on the wax paper, very carefully put your dominant hand beneath the wax paper and lift the lattice up and off the counter. I am right-handed so I use my right hand beneath the lattice. (You will use your opposite hand to help guide the lattice onto the pie.)


Hold the lattice on the waxed paper right next to the pie and very carefully and slowly turn the crust over onto the top of the pie - try to get it as centered as you can because you will not be able to move the lattice once it is on the pie. Do not flop it on quickly. Take your time and go slowly.


Once you have the lattice on the pie, very carefully remove the waxed paper, watching that it doesn't stick to the lattice.  
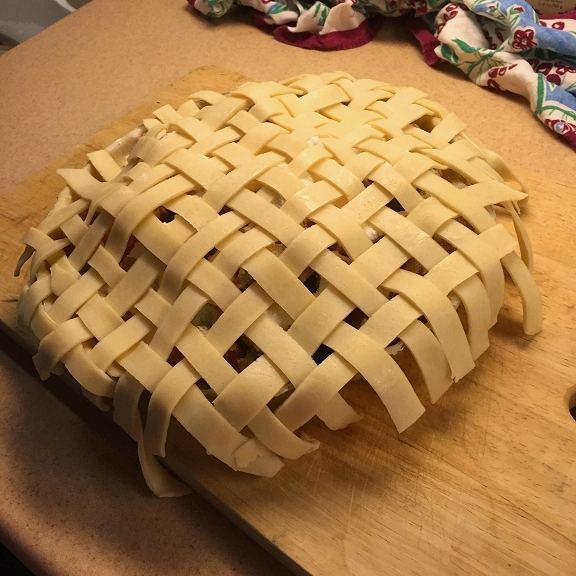


Whew! Now to get rid of those scraggly ends...


Fold any scraggly ends neatly into the crust, creating a nice edge. If you prefer, or if you have too much extra lattice hanging over the edge of the pie plate, you can carefully cut it off and discard it. Once you are finished, you can sprinkle a little bit of sugar on the crust if you like.


Cut a few strips of aluminum foil and form a cover for the crust so that it does not burn while baking. You will remove this foil for the last 15 or so minutes of baking. 

Bake at 425 degrees Farenheit for 40-45 minutes. Remember to remove foil from edges for the last 15 minutes of baking.

If the pie becomes very bubbly while in the oven and starts to drip over a bit too much, you can put a piece of aluminum foil on a rack below the pie so that the drippings don't dirty up your oven.


Allow to cool completely before slicing.
Best served at room temperature.
Serve with a scoop of vanilla ice cream if desired. Refrigerate
 any leftovers. Enjoy!


Are you a fan of strawberry rhubarb pie?
Please leave a comment below!


Pin this post!


Have a great week!
 Laura


Article & images copyright ©Laura Beth Love for Dishfunctional Designs™ 2018
all rights reserved

Friday, June 22, 2018

What Is City Chicken? Old Fashioned City Chicken Recipe


If you have never heard of City Chicken then read on!

What is City Chicken? What is the origin of City Chicken?
City Chicken is a Depression-era meal that is not found in cookbooks. Believe it or not, there was a time in history (pre-1940's) when chicken was actually more expensive than pork, veal, or beef. Poultry farms weren't yet industrialized and available everywhere like they are today, so chicken wasn't as accessible as you might think. 

Yup, it's true! Since folks couldn't afford the expensive chicken, they would use pieces of pork, veal, and/or steak, and skewer them onto a bamboo skewer, bread with seasoned breading, and then fry and/or bake. What exactly is City Chicken? It's not chicken at all, but is made from other meats and shaped to look like a drumstick! 

So gather your supplies, whip up a batch of mashed potatoes and gravy, saute some asparagus or fresh green beans, and make your first batch of City Chicken! 

Best City Chicken Recipe

For this recipe you will need:
Bamboo skewers (about 8 inch long)
Shake & Bake Pork flavor
*For the meat, I use about 1 lb of pork and 1 lb of steak, for about 4 people, so you can adjust accordingly:
Lean pork cubes (I use cup up boneless pork chops)
Lean steak cubes
2 large eggs
splash of milk (about 1/4 cup)
Olive Oil & Crisco solid shortening

Gather all ingredients.
1. Soak the bamboo skewers in warm water for a while before you start, at least 30 minutes is good, a few hours is better. While they are soaking, find a casserole dish that will accommodate the length of the skewers for when you bake them in the oven (I usually use a big lasagna pan).

2. Cut pork and steak into bite-sized pieces for skewering.


3. Skewer the pork and steak cubes onto the bamboo skewers, alternating pork and steak. Do not fill the entire skewers end-to-end, instead leave some space at each end. One inch or so is good. This will make them easier to handle.

4. Put Shake & Bake coating into the bag provided (you can also use regular bread crumbs if you prefer. I find the Shake & Bake makes them nice and crispy).

5. In a pie plate or dish large enough to fit the skewers, beat the two eggs with the milk. 

6. Doing one skewer at a time, dip the meat-filled skewer into the egg and milk mixture and coat the meat on the skewer completely.

7. Allow excess egg to drip off of the skewer and then place the skewer in the bag with the breadcrumbs/Shake & Bake and coat the meat completely with the coating, using your hand outside the bag to squeeze the coating onto the meat. Squeezing it on will make the breading stick very well. Remove skewer from bag and set aside on a plate. Repeat steps above until all skewers are filled with meat, dipped in egg mixture, and breaded. 

8. In a large frying pan melt about 1/3 cup of Crisco solid shortening on medium-low heat until melted and hot - you can use half Crisco and half olive oil instead, or whatever frying of that you prefer. Preheat oven to 350 degrees Fahrenheit.

9. Once shortening/oil is hot, place a few of the breaded meat skewers into the oil and lightly fry to brown the outsides for just a minute or two each. Watch carefully so they don't burn. Use tongs to turn them and once they are brown, remove them and place them on a plate covered with paper towels to drain off the excess oil. 


10. Once all skewers are fried and drained, turn off the oil and remove from heat. Transfer each of the skewers from the paper towels to a lasagna dish or other casserole dish. Cover with foil.

11. Bake in a preheated 350 degree F oven for one hour.


12. Optional: bake for an additional 5 minutes with foil removed to dry out a bit if they look too wet. 


Soak the skewers ahead of time so they won't singe when you fry and bake them


Prepare your egg and breading mixes and set aside


Cube your pork and beef into bite-sized pieces


Skewer the pork and beef, alternating them if you like


These are ready to be dipped in the egg mixture and then breaded


Breaded and ready to be fried up


Fry for a just a minute or two to brown the outsides


Drain the fried skewers on paper towels to blot off extra fat and then place them in a baking dish, cover, and bake for one hour


From oven to table! Golden baked City Chicken. Best city chicken recipe ever!


Serve with a veggie of your choice and mashed potatoes and gravy: perfect comfort food!


Pin this post!


I hope you enjoyed this post.
Please leave me a comment below!

Have you ever eaten City Chicken? 


Have a great week!
 Laura


Article & images copyright ©Laura Beth Love for Dishfunctional Designs™ 2018
all rights reserved

Monday, June 11, 2018

Best Ever Homemade Banana Muffins


Every so often I come across a recipe that I land up making over and over again—a recipe that is too good not to share. This is one of them! A while back I was looking for a recipe to use my overripe bananas in, and after finding a bunch of different recipes on the web and carefully reading through them, I fashioned this one myself by combining what I thought were the very best ingredients. 

Tried, and then tried again another day, and then another, I tweaked the recipe here and there until I was thrilled with the final version, which I am going to share with you today.

But before I start, there are a few secrets that are important to know, and that will make a huge difference in the final outcome of your muffins. 


First off, use three bananas and not two. I've done it both ways and using two bananas for this recipe just doesn't cut it, unless you cut down the rest of the ingredients—which you would have to figure out for yourself caus I just don't have the time or capacity for all that math! 

If you use two bananas instead of three bananas you will have dry muffins. 

If you over-bake them you will have dry muffins. 

If you over-mix them you will have rubbery muffins. 

If you add chocolate chips you will have delectable muffins. 


As you can see in the photos, I added a few walnuts and a few pinches of coconut (which you probably cannot see) to a few of the muffins before I baked them, and the rest I baked with only chocolate chips added. I like walnuts. It's a personal choice. If you want to add some to the recipe, that option is in the recipe as well. 

To bake these, I use standard paper or aluminum baking cups inside of a muffin tin, and after filling the tin with the papers, I lightly spray the cups in the muffin tin with non-stick baking spray. Then I use a one cup measuring cup to fill the cups evenly until all the batter is used up. This recipe makes 12 delicious standard size banana muffins. 

Oh, and before I forget—probably the most important hint from above that will make your muffins perfect is this: do NOT over mix when you add the dry ingredients to the wet ingredients! Just a few stirs until the dry and wet ingredients are completely combined is all you need. Over-mixing will ruin your muffins! Okay, enough talk, here you go:

Best Ever Homemade Banana Muffins
Preheat oven to 375 F
Line a 12-cup muffin tin with cupcake papers and then spray with cooking spray.

In a bowl mix dry ingredients:
1 & 1/2 cups all-purpose flour
1 teaspoon baking powder
1 teaspoon baking soda
1/2 teaspoon salt
1/4 teaspoon cinnamon

Set aside dry ingredients

In electric mixer mix wet ingredients:
1 egg
3 ripe or over-ripe bananas, peeled
3/4 cup granulated white sugar
1 teaspoon real vanilla extract
1/3 cup melted butter (not hot!)

Directions:
- Mix dry ingredients in a bowl and set aside. 
- Mix wet ingredients with electric mixer on medium for a minute until all wet ingredients are well combined. *Note: do not use very hot melted butter. Warm the solid butter in your microwave just until it starts to melt, do not overcook or make too hot. You do not want the hot butter to cook the eggs when you add it to the wet ingredients!
- Add the dry ingredients to the wet ingredients in the mixer and mix just until the two are combined. Do not over-mix!
- Add 1 cup of semi-sweet chocolate chips to the batter and gently fold in with a spatula.
- Optional: add 1/2 cup chopped walnuts.
- Use a measuring cup to fill the prepared muffin cups with batter.

Bake in 375 degree F oven for 10 minutes, then lower the oven temperature to 350 degrees F and bake for an additional 10 minutes or until muffins are light golden brown and the edges are a bit darker golden brown. Remove from oven and cool. Makes 12 muffins. Store in an air-tight container for up to three days.


I hope you enjoyed this post.
Please leave me a comment below! 


Pin this post! 


Have a great week!
 Laura


Article copyright ©Laura Beth Love for Dishfunctional Designs™ 2018
all rights reserved

Friday, May 18, 2018

Homemade Cheese Danish Pastries From My Girls


I awoke Sunday morning to my two teenage daughters busy in the kitchen...it's hard to believe that they are 16 and 13 already—where have the years gone?


I soon found they were making me homemade cheese danishes (my favorite!) for breakfast for Mother's Day. They turned out amazing and when I asked where they got the recipe, I was quickly told that that information was top secret...but I did hear a whisper that sounded something like Washington Post... :)


OMG these were to die for!!


My girls also got together and made me a slideshow card full of funny photos of the three of us, and it made me laugh and cry. What a great Mother's Day.


To all the moms out there, I hope you each had a nice Mother's Day!


Thanks for visiting & have a great week!
 Laura


Article, images, and designs copyright ©Laura Beth Love for Dishfunctional Designs™ 2018
all rights reserved