Friday, February 9, 2018

How To Organize Your Beads For Jewelry Making

When you first start jewelry making and beading, one of the first things you will discover is that you need storage for your beads and jewelry components! I think it's really important to be organized from the get go—it's a real pain to try and organize in a particular way if in the beginning you just lump all of your beads together, so start out by thinking about how you would like your beads organized, and then follow through with that. 

In this blog post I am going to share with you how I organize some of my own beads and components for jewelry making. Everyone has their own ways of doing things. The following are the things that worked best for me, but by all means, do what works best for you!

I organize my beads in a few different ways. First off, I organize by color. This is especially helpful for jewelry making, because obviously you are going to be creating things that most often are color-coordinated, so it makes sense to have all different shades of, say, green - together so that you can see the differences in hues and shades and tones, all in one box. Doing it this way makes it easy to pick just the right color. 

I also organize my beads by material. I most often use beads that are stone and glass. I have a lot of stone beads, and I have a lot of glass beads. Sometimes I mix these different material beads in one project, but most often I create something that is strictly all gemstone/stone, or all glass. 

That being said, I have one set of boxes that are all stone beads, and another set of boxes that are all glass beads. Both sets of boxes are arranged by color. I have one specific box for each color or color family.

I use standard plastic bead boxes that I bought years ago at a craft store - I think it was either Michael's or ACMoore, and I think they came in packs of 2 or 3 or 4—I forget—but my point is that you do not need anything fancy or expensive to store your beads in. The containers I use each have about 17 separate pockets for beads, which stores plenty per box.


I keep most of my boxes stacked in an old bookcase, which works great since it allows me to keep them at eye level and easy to reach. 

Here you can see a few of the examples of my organization by color family. I have one box for pinks & reds, one for yellows & oranges, one for browns & earth tones, etc. 


I also have boxes for different types of metal beads and different finishes. There are sterling silver, silver plated, copper, vintage silver, etc. 


I keep special rows of boxes that contain the things that I use most often. This makes it easy to grab them without searching. Things like pearls, clasps, sterling silver components and Swarovski crystals—I box the crystals by size...one box for 6mm, one for 4mm, etc.  


Here's a peek into one of my blue stone boxes. I have a few blue boxes—one for turquoise shades, one for true blues, one for greenish-blues, etc.


Here's one of my yellows & oranges boxes, where I store things like amber, carnelian, and citrine. 


Here's one of my pearl boxes - I try to organize them by size and shape. I peel the sticker labels off of the bags that they arrive in from the supplier, and stick those labels into the box sections with the beads. This makes it easy to see the sizes at a glimpse, and makes it easy to reorder them if needed.


Here you can see that I saved the bead-strand tags and put them in with the beads. It can be easy to forget what stone is what! Keeping the prices with the beads is essential to determining how to price your finished jewelry. Just how much did you pay for those beads? How much for the strand? How many were on the strand? How much does that come to per bead?


Here is the same photo showing the reverse sides of the tags. Here it tells you info such as: how many beads were on the strand, the name of the stone, whether it was treated (dyed, hardened, etc), and a brief description of shape and or size.


I like to keep metal components in small plastic bags to deter tarnishing, which is oxidation of the metal from it's exposure to air. 

 Here is a box of my glass beads, greens with a few other colors. 

I love green.


I keep many other supplies in these photo boxes that you can buy at most craft stores (I think I bought mine at ACMoore.) These are great for storing wire, chain, jump rings, and headpins—things I buy a lot of.


And finally, no matter how organized I keep my supplies, my workspace usually looks like this! 

I hope you enjoyed this peek into my bead storage and organization and hopefully you were able to take away a good hint or two for organizing your own beads and jewelry making supplies! Happy jewelry making! 


Pin this post! 


Have a great week!
 Laura


Article, images, and designs copyright ©Laura Beth Love for Dishfunctional Designs™ 2018
all rights reserved

Thursday, February 8, 2018

Creative Things You Can Make With Old Baby & Children's Clothes

Recently when blogging about  Valentine's Day-themed and love-inspired craft and upcycle projects I featured this Heart Quilt made from old baby clothes. I also admitted that I did stash away a special piece of my daughter's clothing here and there when packing up carloads of outgrown old kids clothes to send to Goodwill. What would I make with them? I wasn't sure, but once I started to look around for some ideas to use as springboards, I knew I had to share all of these cute ideas that I came across. 

In the past I've written about What To Do With Those Old Baby Shoes, and Creative Upcycled Baby Cribs. Now check out these cute and creative ideas for what to do with old baby clothes! 

Now of course, the best thing to do with old baby and children's clothes is to send them off to someone who can use them, or donate them to Goodwill. These projects are about saving one or two special pieces as mementos and having them transformed into something that is both old and new. 

The obvious choices are sewing projects, and if you don't sew yourself, there are plenty of people who can create these projects for you on Etsy or elsewhere on the internet. But aside from sewing, check out the wall art made with fabric scraps below and be inspired - no sewing experience is needed for this project, just some glue!


Have a stuffed toy made from baby's old sleeper. By nestlingkids


 Memory pillows (above and memory tree below) by cluckclucksew


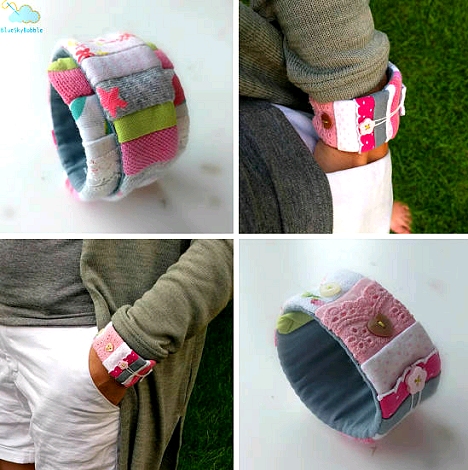
Have a fabric cuff bracelet made by Etsy seller Bluskybubbleatelier


Turn those old baby clothes into a pillow. These you can order from Uncommon Goods


Create some wall art with old cloth scraps. Tutorial by Chasing Cottons


Rag quilt made from old baby clothes


What do you think?

You may also like:


Have a great week!
 Laura


Article, images, and designs copyright ©Laura Beth Love for Dishfunctional Designs™ 2018
all rights reserved


Wednesday, February 7, 2018

Upcycled: New Uses For Old Chairs - Part 2


Oh my gosh, I can hardly believe that it's been SIX years since I published my first blog post collection of Upcycled Chairs! Wow! 
(If you haven't seen that post, check it out! Upcycled: New Uses For Old Chairs)

So many of the ideas shared in that post have taken off and have given birth to new innovative ideas, which I think is amazing. 

I love to see how people recreate their own versions of things, and especially how they add their own creative twist on something. Whether it be changing up the design, or using an interesting, unique combination of colors, or just being inspired to create something completely different and new—it's all really neat to watch!

Now it's time for the next round of inspiration, so check out these cool new creations made from old chairs and maybe you'll be inspired to create something new too! 


Use two old chair backs to form an occasional table


I love these brightly painted chair benches


Turn an old spindle chair into a shelf; add hooks.


From chair to chaise, just add a pillow or two.


Old chairs to new bench instructions from Instructables


Use chalkboard paint to turn an old chair back into a chalk board. 


Transform three old dining chars into a bench


Another old chair back transformed into a shelf - or added to a shelf.


Chair backs turned into cork boards


A cut in half chair bottom turned into a little hanging shelf


Caned chair back turned earring holder


A old chair turned into a plant stand. Just remove seat and insert a container.


Old chair is now a new hanging display shelf. No paint needed here. 


Top of an old chair - add knobs to serve as hooks


Cut in half and turned upside down, this old chair is now a wall display. Be careful not to overdo it, remember sometimes less is more.


Old chair bottoms with new seats added make cute stools.


Not sure if this was made from an actual chair or not, but cute.


Old chair back turned into a dog or cat bed. 


What do you think?


Have a great week!
 Laura


Article, images, and designs copyright ©Laura Beth Love for Dishfunctional Designs™ 2018
all rights reserved

Friday, February 2, 2018

Heart Quilt Made With Old Outgrown Baby Clothes


Second on my list of Valentine's Day-themed and love-inspired craft and upcycle projects is this Heart Quilt. But it's not just any old heart quilt - the patchwork hearts are all made from old baby clothes. (insert slow teardrop rolling down mom's cheek right about here)...sigh. 

I know that feeling for sure! And yes, I'll admit it, I did happen to stash away a special piece of my daughter's clothing here and there when packing up carloads of my daughters' outgrown old kids clothes to send to Goodwill. 

I remember the laughs from my two little girls as they played in my mother's backyard on a hot summer day, splashing in the kiddie pool or eating popsicles but getting most of it on their shirts...those were the days... and well, I tried to steal back as much as I could of them with my giveaway-clothes thievery. 

It's just a few pieces, and one day I will use them in something amazing...I told myself. 

And then this quilt came along. 
With the little hearts. 
Made from old baby clothes. 
(!!!) 

It's been a few years since I used my sewing machine, and many more since I made my last quilt, so I'm not very ready to just jump into the project—but it's the perfect idea to kind of tuck away in the back of my mind for another day. 

In the past I've written about What To Do With Those Old Baby Shoes, and Creative Upcycled Baby Cribs maybe it's time for me to write a new blog post about what to do with those old baby and children's clothes (stay tuned!)


What do you think?


You may also like:


Have a great week!
 Laura


Article, images, and designs copyright ©Laura Beth Love for Dishfunctional Designs™ 2018
all rights reserved


Thursday, February 1, 2018

DIY Valentine's Day Centerpiece With Conversation Hearts


Valentine's Hurricane vases 


Since Valentine's Day will be here soon I thought I would share a few of my very favorite Valentine's Day-themed and love-inspired craft and upcycle projects throughout the week.

First up is this super-cute project from Amanda Jane Brown, who used conversation hearts to create this pretty centerpiece for your table. 


For this project you need: 

Conversation hearts 
Pillar candles
Wide ribbon 
Glass hurricane style candle holders
Disc of cardboard to place below the candle in between the conversation hearts and the candle to help keep the candle level.

This project would also be cute with large mason jars. If you aren't a big fan of the pink ribbon, you could choose any color from the conversation hearts and go with that. You can also use this same idea for any theme, holiday or season by simply changing up the candy filler with whatever is in season. 


Did you know that there are tons of fun things that you can create with conversation hearts?  Check out this blog post I did a few years ago that highlights some cool conversation heart art and crafts. 


What do you think?


Have a great week!
 Laura


Article, images, and designs copyright ©Laura Beth Love for Dishfunctional Designs™ 2018
all rights reserved